In this case study we will be using movement to quantify the collective behaviour of a herd of zebras in escape response. The data we will use is part of a larger dataset collected in Mpala (Kenya), in which researchers simulated predation events to study the group response of the animals. We will demonstrate how we can compute useful metrics for this analysis using movement.
NoteUsing the right environment
If you are following along this chapter on your own computer, make sure to run all code snippets with the animals-in-motion-env environment activated (see prerequisites A.3.3).
6.1 Dataset description
The 3.5-min dataset presented here consists of 44 trajectories of zebras (Equus quagga) expressed in a coordinate system fixed to the ground. Each individual has two keypoints (head and tail).
The data was collected with a camera drone that followed the herd and recorded video data. Note that since both camera and animals are in motion, applying a pose estimation directly to the video data would confound both sources of movement. We need the trajectories of the animals relative to the ground, rather than relative to the drone. We computed the ground trajectories as follows: first, a trained SLEAP model was run on a video clip recorded from the drone. This way we obtained the trajectories of the zebras in a coordinate system linked to the drone. Then, we computed the position and orientation of the camera drone at each timestep by applying Structure-from-motion (with OpenSFM and OpenDroneMap). This allowed us to express the trajectories in a coordinate system fixed to the ground, and allowed us to disentangle the motion of the zebras from the movement of the camera drone. After this coordinate transformation, the data was cleaned by removing low-confidence keypoints and implausible data points.
You can find a detailed description of the approach as a collection of notebooks in this repository. Further details about the dataset and the prototype pipeline can be found in Duporge, Miñano et al(2025).
NoteAcknowledgement
The sample video and original SLEAP trajectories were kindly shared by Dr. Isla Duporge from the Rubenstein Lab at Princeton University, with permission to use for this workshop. The trajectories in world coordinate system were computed by Sofía Miñano, Niko Sirmpilatze and Igor Tatarnikov.
6.2 Load and explore the dataset
First, let’s load and explore the dataset
import matplotlib.pyplot as pltimport numpy as npimport xarray as xrfrom movement import sample_datafrom movement.kinematics import compute_speedfrom movement.transforms import scalefrom movement.utils.vector import compute_norm, convert_to_unitfrom movement.utils.reports import report_nan_values
Downloading data from 'https://gin.g-node.org/neuroinformatics/movement-test-data/raw/master/metadata.yaml' to file '/home/runner/.movement/data/temp_metadata.yaml'.
We can see the poses datasetds is made up of two data arrays, position and confidence. In this example, we will use the position data array only, which spans four dimensions: time, space, keypoint and individual. We can verify there are 44 individuals in this dataset (track_0 to track_43) and two keypoints per individual, labelled H (head) and T (tailbase). The data was collected at 29.97 frames per second, and the dataloader used this information to automatically express the time dimension in seconds.
NotePosition units
The position data in ds is expressed in arbitrary units. This is because no GPS data was available for georeferencing or defining ground control points in the structure-from-motion (SfM) analysis. As a result, the scale factor remains a free parameter in the reconstruction of the world coordinates.
Note however that this will not be a problem for our analysis, since the relative positions between the individuals are still correct. Moreover, we will use the median zebra body length to scale the data to more informative units. For more details on the coordinate systems involved in SfM analysis see the OpenSfM documentation.
6.3 Compute the body length per individual
We define the body vector for each individual as the vector going from the T keypoint (tail) to the H keypoint (head).
We can compute the body length of each individual by computing the norm of the body vector.
# Compute body length per individualbody_length = compute_norm(body_vector)
It would be useful to check if there are missing values in the body length array. We can quickly inspect this using movement’s report_nan_values() function.
The output shows that the number of missing values per individual varies between 0.27% and 19.92%. This is not necessarily a problem for our analysis, but it is something to keep in mind when interpreting the results. These missing points are likely due to imperfect tracking of one or both of the keypoints required to compute the body vector.
Let’s compute some basic statistics to get a sense of the distribution of the body length values.
Body length mean: 20.45 a.u.
Body length median: 20.43 a.u.
Body length std: 2.32 a.u.
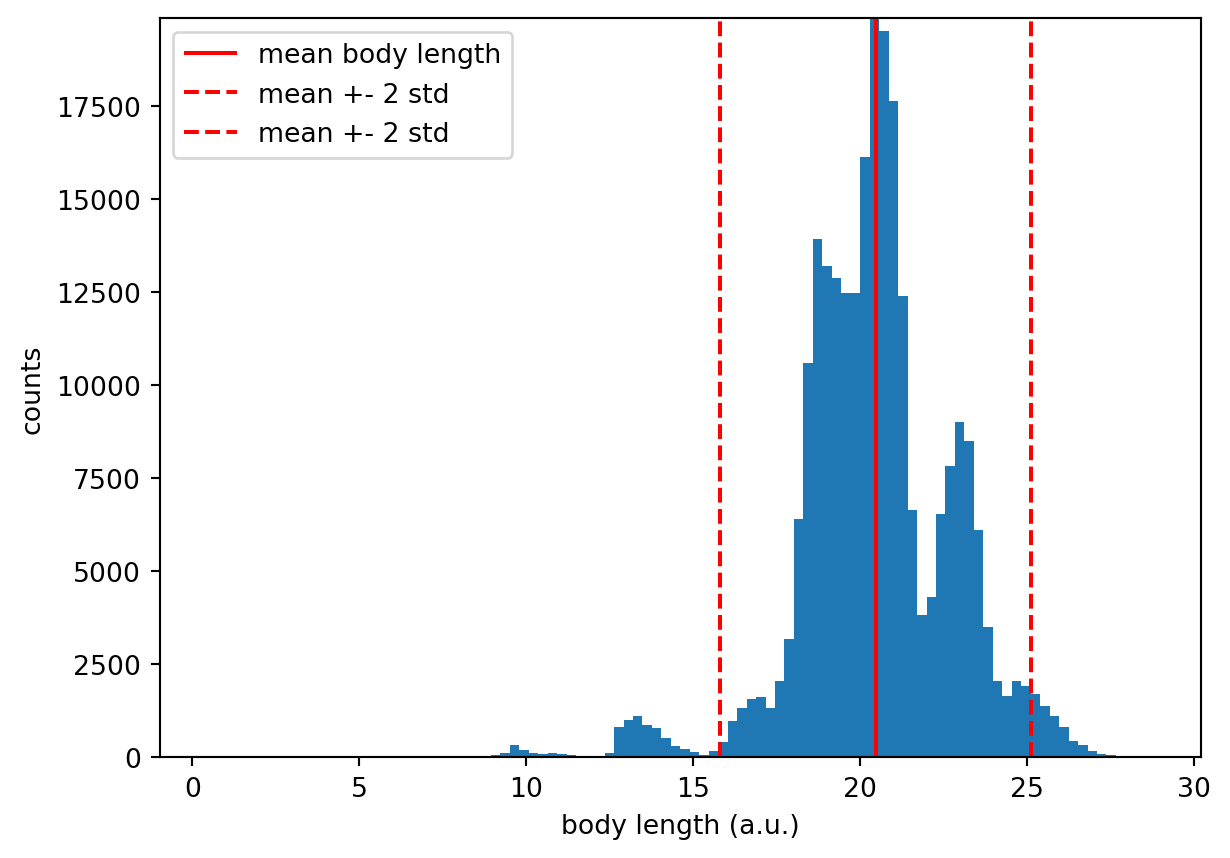
We can also plot the distribution of body lengths.
Code
fig, ax = plt.subplots()# plot histogram of body length valuescounts, bins, _ = body_length.plot.hist(bins=100)# add reference lines for mean and mean +- 2 stdsax.vlines( body_length_mean, ymin=0, ymax=np.max(counts), color="red", linestyle="-", label="mean body length",)lower_bound = body_length_mean -2* body_length_stdupper_bound = body_length_mean +2* body_length_stdfor bound in [lower_bound, upper_bound]: ax.vlines( bound, ymin=0, ymax=np.max(counts), color="red", linestyle="--", label="mean +- 2 std", )ax.set_ylim(0, np.max(counts))ax.set_xlabel("body length (a.u.)")ax.set_ylabel("counts")ax.legend()
Figure 6.1: Distribution of zebra body lengths.
We can see there is some variability in the body lengths per individual. Part of it may reflect the diversity across individuals, but from visual inspection of the video we expect the majority of it to be due to imperfect tracking of the keypoints. To remove some of these outliers, we continue the analysis considering only the samples in which an individual’s body length is within 2 standard deviations of the mean.
We apply the mask to the position data array itself, so that every metric we compute from here on is based on the same cleaned data.
# `within_2_stds` has (time, individual) dimensions, so it broadcasts# across the space and keypoint dimensions of the position arrayposition_filtered = ds.position.where(within_2_stds)
The filtered body vectors then follow from the filtered positions.
We would now like to inspect the orientation of each individual in relation to the group while the simulated escape events take place.
For this, we first compute each animal’s unit body vector. These are a scaled version of the body vectors we just computed, normalised to have unit length. movement provides a convenience function to do this, convert_to_unit():
We now define the herd vector as the mean of the unit body vectors across all individuals detected per frame. The mean vector of a set of \(n\) vectors is the sum of all the vectors (i.e., the resultant vector) scaled by \(1/n\).
The resulting array has (time, space) dimensions, which means that we have a single herd vector defined at each timestep.
The norm of the herd vector will be bounded between 0 and 1, because it is the mean of a set of unit vectors. This is convenient because it already gives us an intuition of how aligned the whole herd is. When the herd vector norm is close to 1, it means that the majority of the unit body vectors are aligned. When its norm is close to 0, it means that the unit body vectors are dispersed. The norm of the herd vector is sometimes called polarisation.
polarization = compute_norm(herd_vector)
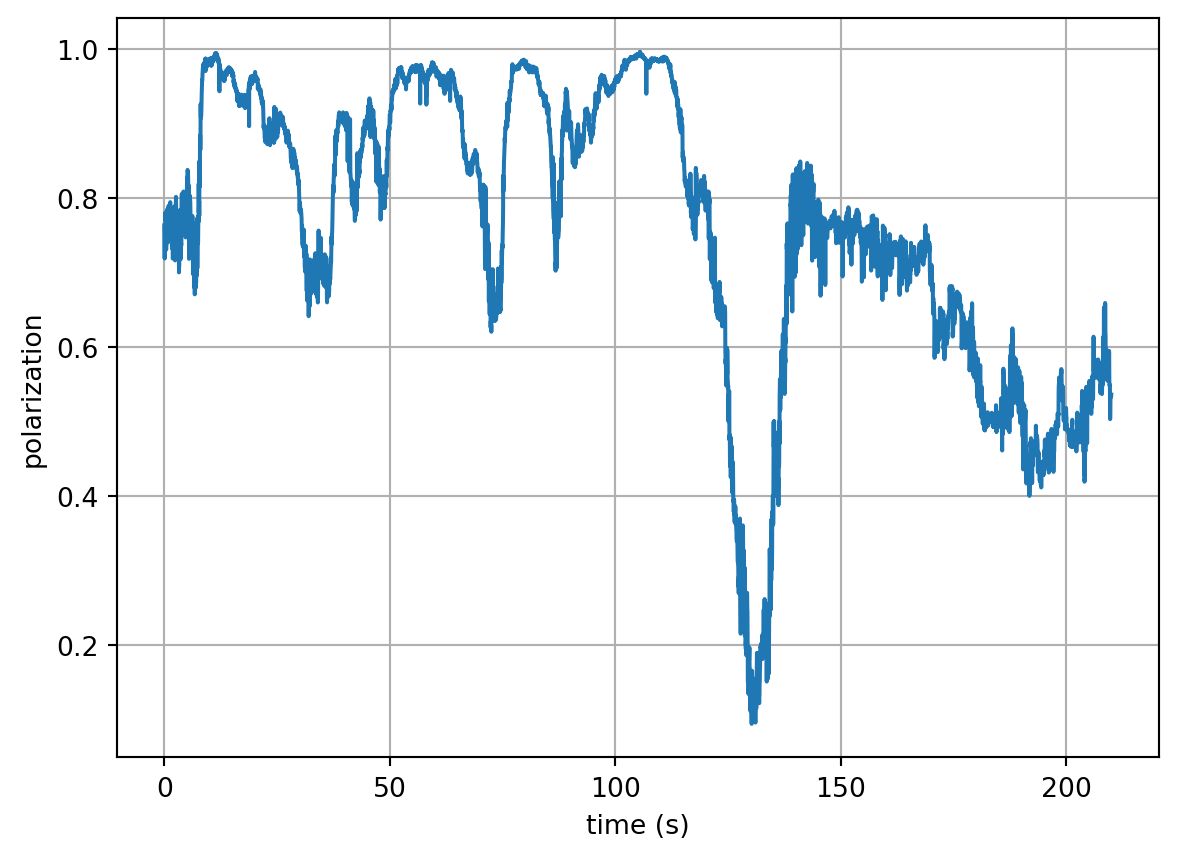
We can plot the evolution of the polarization over time to get a sense of how the herd’s alignment changes.
Figure 6.2: Evolution of the herd’s polarization over time.
The plot suggests that the herd alternates between periods of higher and lower polarization.
To confirm that these fluctuations correspond to the herd’s actual orientations, we can additionally create an animation that plots each individual’s unit body vector and the herd vector for every frame, and present this alongside the polarisation-over-time plot and the drone footage. The resulting video is shown below. The top-left panel shows the polarisation trace, while the top-right panel shows the per-frame visualisation of the herd’s orientation: the black arrows are the unit body vectors, the red arrow is the herd vector (whose norm is the polarisation value), and the purple line under the herd vector is the equivalent unit vector.
Figure 6.3: Polarisation over time alongside the unit body vectors, the herd vector and the drone footage.
6.5 Compute average speed of the herd
We can also inspect how the speed of the herd changes over the course of the simulated escape events.
First, let’s scale the filtered position data to express it in units of body lengths (BL). This will make the results more interpretable. We can use movement’s scale() function to do this.
Note that the scaling factor is the median body length computed over the unfiltered data. The median is quite robust to outliers, so we leave it as is since recomputing it after filtering would make little difference.
For simplicity, we would also like to reduce the position of each individual to a single point. A good candidate for this is the centroid, which is the mean of all the keypoints per individual. In our case, the centroid will be the midpoint between the head and tail keypoints.
centroid = position_scaled.mean("keypoint")
TipExercise 6.1
Use the centroid data array to:
Compute centroid_speed, the speed of each individual’s centroid.
Compute herd_speed, the average speed across all individuals.
Plot the evolution of herd_speed over time.
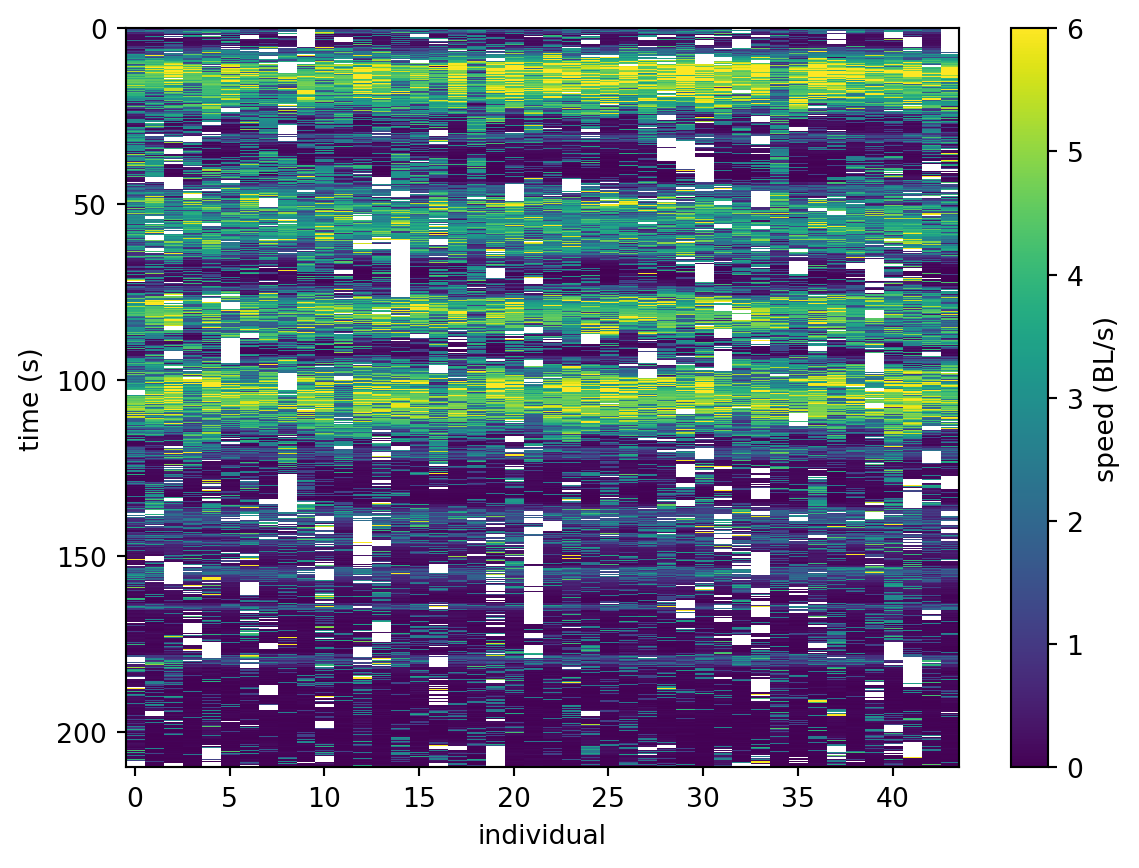
We can now plot the speed of each individual over time.
Code
fig, ax = plt.subplots()im = ax.matshow( centroid_speed, aspect="auto", cmap="viridis",)# convert frames to seconds in y-axistime_ticks_step =1498time_ticks = np.arange(0, len(centroid_speed.time), time_ticks_step) time_labels = [f"{t:.0f}"for t in centroid_speed.time.values[0:-1:time_ticks_step]]ax.set_yticks(time_ticks)ax.set_yticklabels(time_labels)ax.tick_params(axis='x', bottom=True, top=False, labelbottom=True, labeltop=False)ax.set_xlabel("individual")ax.set_ylabel("time (s)") # add colorbarcbar = plt.colorbar(im)cbar.set_label("speed (BL/s)")ax.get_images()[0].set_clim(0, 6) # cap values at 6 BL/s
Figure 6.4: Evolution of the speed of each individual over time.
The plot suggests that the individuals change speed in a coordinated way, with four clear peaks matching the four simulated escape events. The white gaps are the samples we discarded, either because the individual was not detected or because its body length fell outside the range we defined above.
6.6 Polarization vs speed
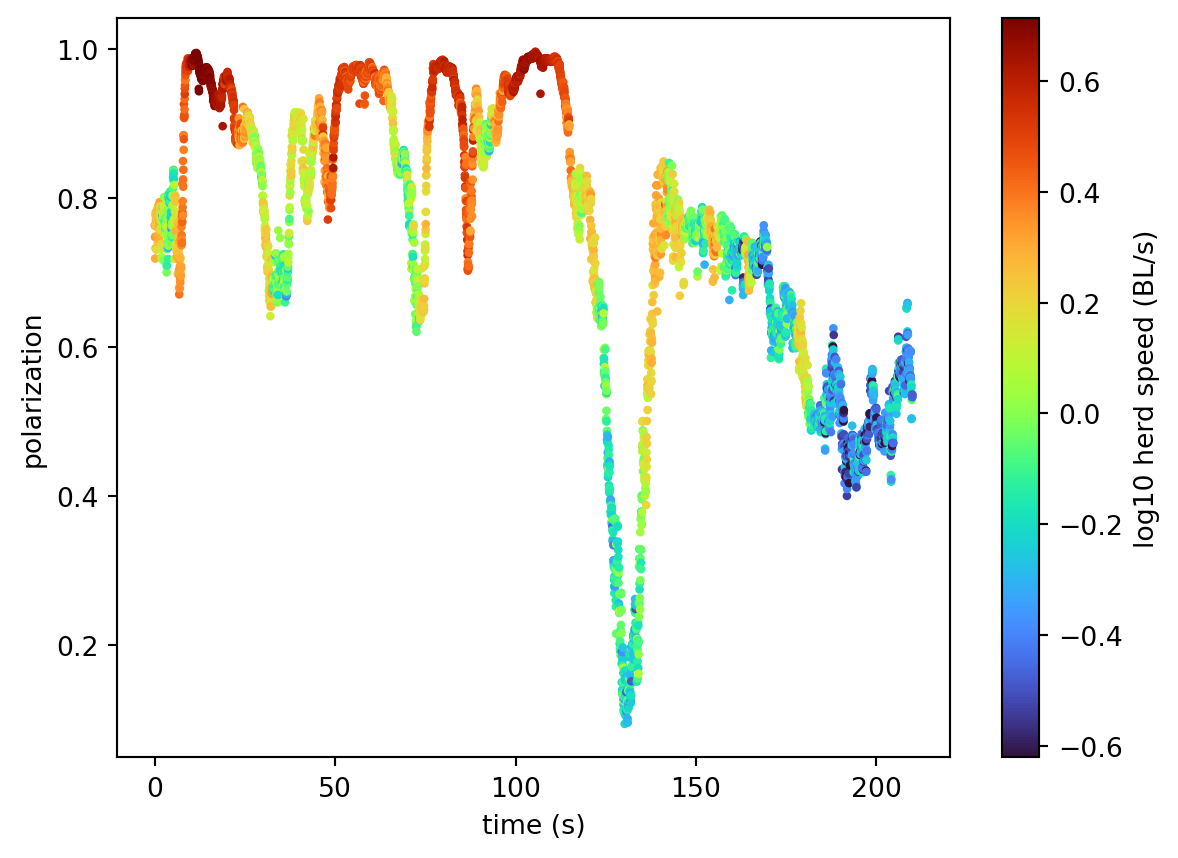
Let’s now bring everything together and examine how polarisation varies with the herd’s speed.
The distribution of herd speeds is skewed towards low values, so we use the logarithm of the speed to better resolve differences across the lower and middle range when colouring the points.
log10_herd_speed = np.log10(herd_speed)
We can now plot the polarization in time, colouring the points by the logarithm of the speed.
fig, ax = plt.subplots()sc = ax.scatter( x=polarization.time, y=polarization, c=log10_herd_speed, s=5, cmap="turbo",# rescale color map to 1st and 99th percentiles vmin=log10_herd_speed.quantile(0.01).item(), vmax=log10_herd_speed.quantile(0.99).item(),)ax.set_xlabel("time (s)")ax.set_ylabel("polarization")cbar = plt.colorbar(sc)cbar.set_label("log10 herd speed (BL/s)")
Figure 6.5: Periods of highest polarization are associated with higher speeds
The plot shows that for this dataset, the periods of highest polarization are associated with higher speeds. This is consistent with the interpretation that the zebras become more aligned when escaping at speed, and more dispersed when they are at rest.
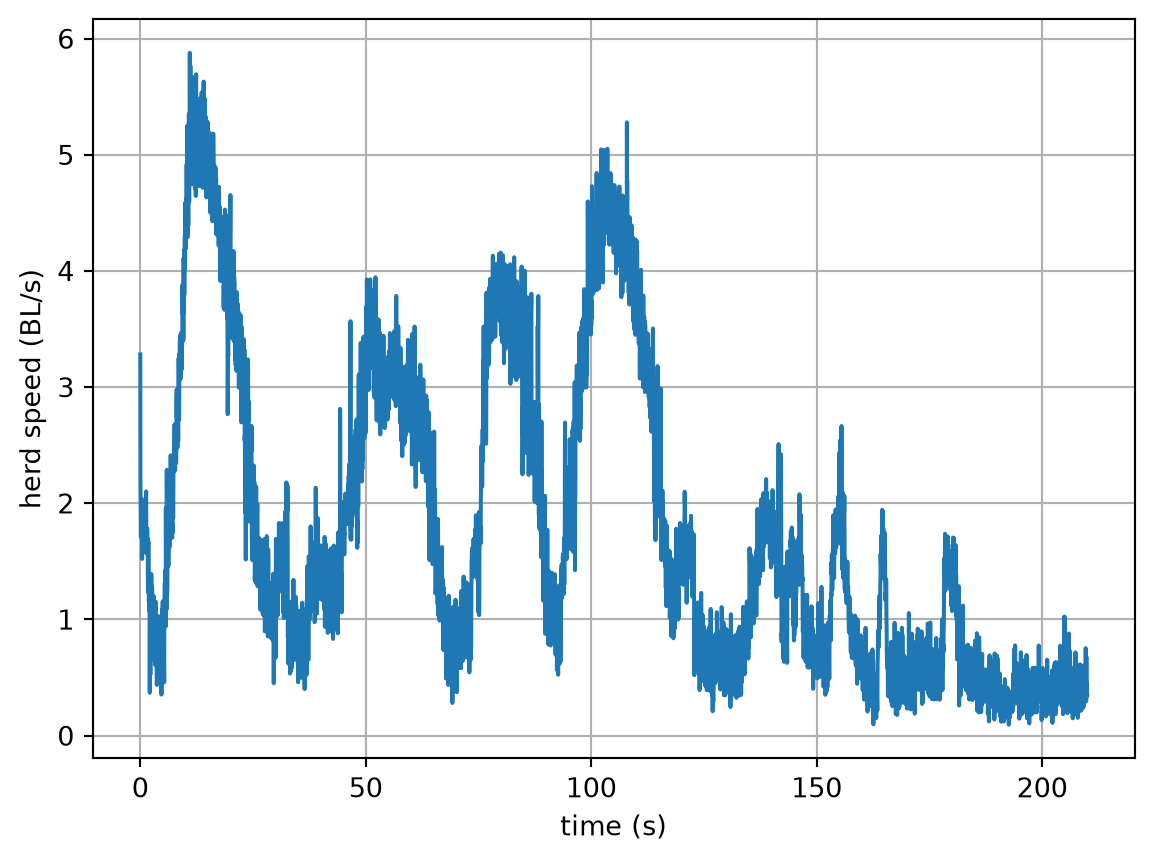
# Compute speed of each zebra's centroidcentroid_speed = compute_speed(centroid)# Compute the average speed across all individualsherd_speed = centroid_speed.mean("individual")# Plot the evolution of the herd speed over timefig, ax = plt.subplots()ax.plot(herd_speed.time, herd_speed)ax.set_ylabel("herd speed (BL/s)")ax.set_xlabel("time (s)")ax.grid()
We can see that there are four periods in the dataset in which the speed of the herd surpasses 2 BL/s for about 10 to 20 seconds.
Duporge, Isla, Sofia Minano, Nikoloz Sirmpilatze, et al. 2025. Tracking the Flight: Exploring a ComputationalFramework for AnalyzingEscapeResponses in PlainsZebra (Equus Quagga). arXiv. https://doi.org/10.48550/arXiv.2505.16882.